
How To: Add Harmonisation Codes to Invoices using Basic Reports
- WARNING: Before making changes to ANY of your Basic Report templates it is advisable to take a backup.
| | Basic Reports is an Advanced User feature. |
| |
|
|---|
The Harmonisation Code pulled from the stock item's [ Stock | Detail | Accounting ] screen can be placed on the Basic Report design in the detail section to allow for an international Invoice design for use with international customers.
Note: before making changes it maybe useful to:
- Make a backup of your reports.
- Try this out on your testing system to ensure that the changes are as required before implementing it in your live system.
These options are already setup for you if you are using a new Customs Invoice, see How To: Setup a New Customs Invoice.
Preparing to add the new fields
- Follow the menu route
[ System Operations | Basic Reports Setup ]to open the "Basic Reports Setup" dialog. - From the dialog's
[ Reports List ]tab, double-click on "Invoice Report". - If this is a new report, you will need to click on the
 button. This displays a new report that can be configured. As this is a 'blank' basic report you may wish to use the following options:
- In the 'Report Template Path:' field at the bottom of the window, use
 to navigate to and open the main Sales Invoice Report template.
 - The
 button opens the loaded report in design view, allowing the user to make changes to the report. Before you make any changes select Save As... from the file menu, to make sure you do not overwrite the original template.
- In the 'Report Template Path:' field at the bottom of the window, use
- Press the button to edit the Sales Invoice's report template using Report Builder Designer.
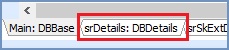
Note: you can save the current layout with a new name so that you don't affect the invoice layout as you are updating it. It also means that you have a backup. To do this select Save As... from the file menu. - Click on the srDetails: DBDetails tab at the bottom of the screen.
- You may need to make some room while you are manipulating the layout of the new fields. To do this:
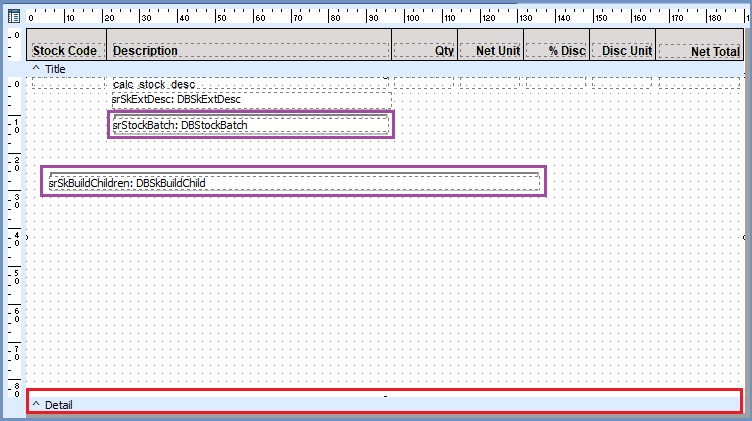
- Click on the Details bar (in red in the image).
- Drag the bar down the page about 6 or 7 cm below any existing fields, in the image it is srSkBuildChildren (the bottom purple box) .
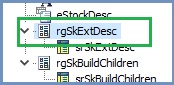
- Notice the two fields that have a purple outline. The thicker grey line around the box means that these fields are part of a 'Region' and need to be handled carefully if you wish to move them. We are going to move the field srSkBuildChildren region (the bottom purple box) as we will be adding the Country of Origin and the Intrastat Code above it so need to make room. To do this:
- Click on the srSkBuildChildren region (the bottom purple box) and you will see that the rgSkBuildChildren region has been selected in the report tree on the left (in green).
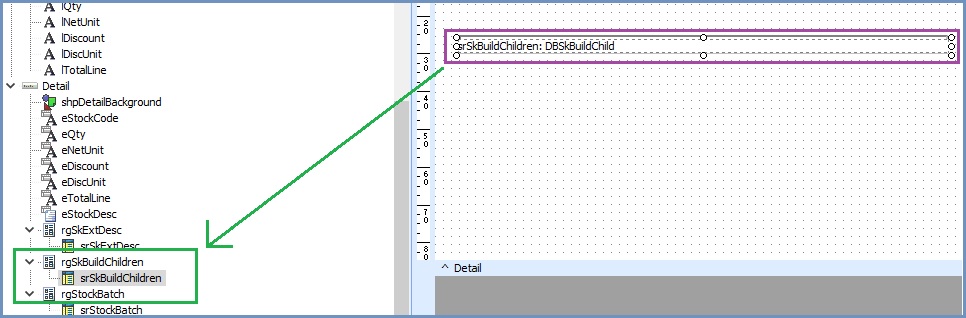
- Below the Report Tree panel the configuration options for the selected field are now displayed. This is where you make your changes.
- Make sure you have selected the rgSkBuildChildren in the Report Tree.
- In the panel below find the Layout section as this is where we are going to make the changes so the rgSkBuildChildren can be moved down the page.
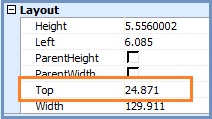
- The Top is the distance between the top of the Region box and the top of this part of the form. This is the figure that needs to be increased in order to move the rgSkBuildChildren down the page.
- Change the Top to about 80.00, this might take a bit of trial and error.
- Click on the srSkBuildChildren region (the bottom purple box) and you will see that the rgSkBuildChildren region has been selected in the report tree on the left (in green).
- If you are happy with the layout so far, it is best to save what you have done by going to File -> Save. As you are making changes to your report is is best to save regularly, otherwise you may lose all your hard work and have to start again.
- In our example we will also need to move the rgSkExtDesc region, the top region as this needs to be closer to the field above it, in this case the calc_stock_desc.
- You can work out the rough place that the rgSkExtDesc region needs to move to by clicking on the fields above and adding together the Heights in the Layout section. In our example there is only one field above, calc_stock_desc and that is 3.175. That means that if we change the Top for the rgSkExtDesc region to 4.00, then it should move to just below the calc_stock_desc field.
- Click on the srSkExtDesc' region (the top purple box) and you will see that the rgSkExtDesc' region has been selected in the report tree on the left.
- In the panel below find the Layout section as this is where we are going to make the changes so the rgSkExtDesc can be moved up the page to below the field directly above it.
- Change the Top to the value you calculated in step 8.1 above, again this might take a bit of trial and error.
- If you are happy with the layout so far, it is best to save what you have done by going to File -> Save.
Adding the Harmonisation Code and Information
It is possible to add the following Harmonisation Code information:
- harmonisation_code
- country_id
- harmonisation_desc
- hcode_id
- stock_id
See Also
- System Operations - Basic Reports Setup
- Report Builder Designer
- Basic Reports - Available Data Fields